


 2:44 PM
 SHUBHO BHAI


Edit or modify blog navigation menu blogger tips : Hi Friends, welcome to my blog. i think today your nice day. You already known that what do i want to write on this post. Yes, i want to write about blogger tips on the topic is Edit or modify blog navigation menu of blogger website.
By this tutorial you are not only able to modify blogger navigation. i think you can to modify or change many place of navigation. Friends, this is little HTML, and CSS tutorial. just you need to change simple and few text. don't worry if you don't know html or css, i will show you very easy step then you can to change or modify blog navigation without knowing html or css. just follow my step with screenshot.
If you have enough time or wish to learn How to upload blogger template or theme easy tutorial
1. Step. Now login to you blogger account for blogger dashboard and click on down array icon of which blog you want to change the navigation.

2. Step. Here you will see the drop-down navigation. just click on "Template" form all.

3. step. On this page you have to click on 'Edit HTML" like below.
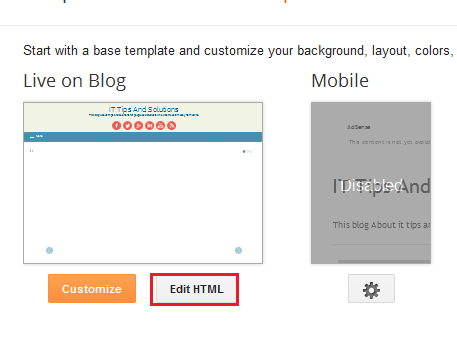

If you get like this code above image just replace you navigation text such as Apps, Game, Live Wallpaper, or copy the code below and replace with below code of that code above image
<nav id='nav'>
<div id='navnya'>
<ul id='isinya'>
<li><a expr:href='#'>Home</a></li>
<li><a href='#'>Apps</a></li>
<li><a href='#'>Games</a></li>
<li><a href='#'>Live Wallpapers</a></li>
<li><a href='#'>Lunchers</a></li>
<li><a href='#'>Themes</a></li>
<li><a href='#'>Widgets</a></li>
<li><a href='#'>Wallpapers</a></li>
<li class='dgnsub'><a href='#'>More</a>
<ul class='submenu hidden'>
<li><a href='#'>Sub Menu</a></li>
<li><a href='#'>Sub Menu</a></li>
<li><a href='#'>Sub Menu</a></li>
<li><a href='#'>Sub Menu</a></li>
<li><a href='#'>Sub Menu</a></li>
<li><a href='#'>Sub Menu</a></li>
</ul>
</li>
</ul>
</div>
If you want to change navigation text change the read color text with your own text. Download above code.
5. Step. After that press Ctrl+F and find this code </b:skin> and past the below code above of this </b:skin> code and on save template. Download CSS Code Here.
/* Navigation
----------------------------------------------- */
#nav{position:relative}
#mobinav,#mobitopnav{display:none}
#navnya{border-bottom:2px solid #017ACA}
#navnya ul{height:30px;margin:0;padding:0}
#navnya li{list-style:none;display:inline-block;zoom:1;margin:0;padding:0;float:left;position:relative}
#navnya li a{display:block;line-height:30px;text-decoration:none;color:#017ACA;padding:0 15px}
#navnya ul.submenu{position:absolute;height:auto;width:150px;z-index:2;background-color:white;border:1px solid #017ACA;border-top:0;display:none}
#navnya ul.submenu li{width:100%}
#navnya ul.submenu li:nth-child(even) a{background-color:#E5F7FF}
#navnya ul.submenu a:hover{padding-left:20px}
#navnya a:hover{color:black}
#navnya li.dgnsub{padding-right:10px}
#navnya li.dgnsub::after{content:"";width:0;height:0;border-width:6px 4px;border-style:solid;border-color:#1E69AF transparent transparent transparent;position:absolute;top:12px;right:7px}
#topnavx{height:20px}
#topnav{float:right;border-bottom:1px solid #CECECE}
#topnav ul,#topnav li{padding:0;margin:0;list-style:none}
#topnav li{display:inline-block;float:left;position:relative}
#topnav a{display:block;line-height:20px;padding:0 10px;border-left:1px solid #CECECE}
#topnav ul.subnyax{position:absolute;z-index:2;right:0;width:140px;border:1px solid #CECECE;border-top:0;top:19px;background:white;display:none}
#topnav ul.subnyax a{border-left:0}
#topnav ul.subnyax li{width:100%}
#navnya ul.submenu.hidden,#topnav ul.subnyax.hidden{display:block;-khtml-opacity:0;-moz-opacity:0;opacity:0;visibility:hidden}
#navnya li:hover ul.submenu.hidden,#topnav li:hover ul.subnyax.hidden{-khtml-opacity:1;-moz-opacity:1;opacity:1;visibility:visible}
screenshot.
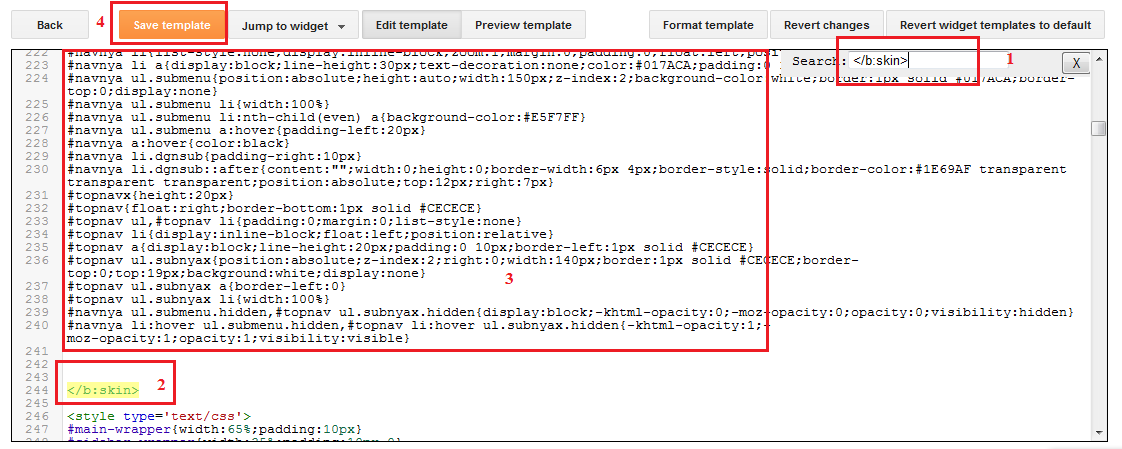
I have done all the steps I think you can to do very easy after reading/ following my article. if you are not clear about my article just watch the video tutorial here. Like my fb page.
if you face any problem don't forget to comment below on our comment section. Thank you.


