Tuesday, April 7, 2015

How to upload blogger template or theme easy tutorial

How to upload blogger template or theme easy tutorial : Hi Friends, If you have wish to create a beautiful blog you have to knowledge to modify blogger template or theme. Then you need to know html, css, java script etc. but if you know how to upload or customize a blogger template or  theme so you don't need to learn html, css, java script and others program. 

But you have wish to create your own blogger template you can to learn those program.  but don't worry if you don't know any program no problem. cause know i will teach you how to upload blogger template or theme. This tutorial never difficult to you it will be very easy tutorial. just read my full article on this topic. you have some time you can to read others article  here Tutorial how to add Facebook fan page like box on blogger. 


1. Now go to www.blogger.com and login your blogger account for blogger dashboard. there have many blog if you already created. Now choose your blog which blog you want to modify or upload template or theme. click on down array from the navigation array. See screenshot below.


When click on down array there you will get more navigation. You need click on 'template' option see below picture. 
2. Now you are on new page  on this page see the top of the right corner button below of you name ' "Backup/ Restore" click on this button. screenshot below.


3. After clicking on "Backup / Restore" Button there will be appear small java script window. on this window
you can to save/download your active template  or browse the computer folder for template which you want to upload on this blog. Browse the computer folder and choose the template and click on upload button, it may take few second to upload. after done you will get successful message.  see screenshot below. 


Note : If you don't have blogger theme or  template please search on google for free blogger template.

After reading this article if  you are not clear about uploading template so watch the video tutorial here. if you like this article share with your friend and please like my fb page here.

Sunday, April 5, 2015


Hi Friends, Thanks for being here on my website. I think you already understood what do i want to say. yes, i want to write about how can you create single name means only first name on Facebook. it's very enjoyable to me i think you like too. 


This tips is very easy never difficult to all of you. just you have to follow some step. then you can to create only single name or first name on Facebook. at first i want to inform you this is not for available all country in the world. I know that it's only valid of Indonesian country IP/Location people. 

But to day i will teach you how can you create only single or first name on Facebook if you are not Indonesian. OK let's start. 


Part 1:- Proxy Settings For Browser
First of all to use single name on Facebook. We need to Add manual proxy settings in our browser. So we need to use Indonesian proxy Search it at Google or i recommend to find it from Proxynova.com or any other site of your choice. 
If you have knowledge about Using proxy settings in browser then its good. If you are don't know how to add proxy then.

 OR

In case Your are not able to add proxy settings and facing any problem then i recommend to download Hola Better Internet VPN.

 Install Hola Extension in Firefox or Chrome and then turn ON Hola and search and select Country Indonesia.

It will automatically Implement proxy settings on your browser so you don't need to add proxies manually.


 Part 2:- Settings To Make Single Facebook Account

1. After doing proxy settings manually or by using Hola extension make sure it is working fine on Facebook.
2.  Now its time to create single name id to do this.
3. Open your Facebook Account  Settings.

4. Change your language to Bahasa Indonesia.


Then  edit your current Facebook profile name and Simply remove Your Last Name. After that review your name and Save it.


After that your Facebook Account is only using First Name and you will see that Last Name Hide.

After Completing all steps, Remove Manual Proxy or Turn off Hola and change your language back to English (US) or other according to you.

 Note:- Make Sure that You Don't had already changed your account name from last 60 days and otherwise you will not be able to make single name until you crossed 60 days time period. If you crossed name change limit then it is not possible try it on another account.

I think there is no Need of Proof because our Tricks is working from Aug 2012 we have 7k fan here.

Thursday, April 2, 2015

How to add contact form and tab at facebook page

How to add a free contact form and tab at Facebook page : to day i will teach you How to add a contact form and tab at facebook page. if you have a page it's will be very helpful. 
This is a very easy job it can to do all if they have basic knowledge about internet, computer Facebook. I means you think you need to teach any web programing or etc but i told you that you no need to learn any web programing. just you have to few moue click. but you must have a page for this tutorial if you don't have a Facebook page now read this article Facebook tips for Create Facbook Fan Page Easy.


1. Now go to this site www.123contactform.com  login this site if you don't have account so  create an account and create a form to add form at your Facebook fan page if you don't understand see screenshot below. there have 3 plane you chose free plane. i have already register so i will login direct. fill out the form like below and click on  Create Account.

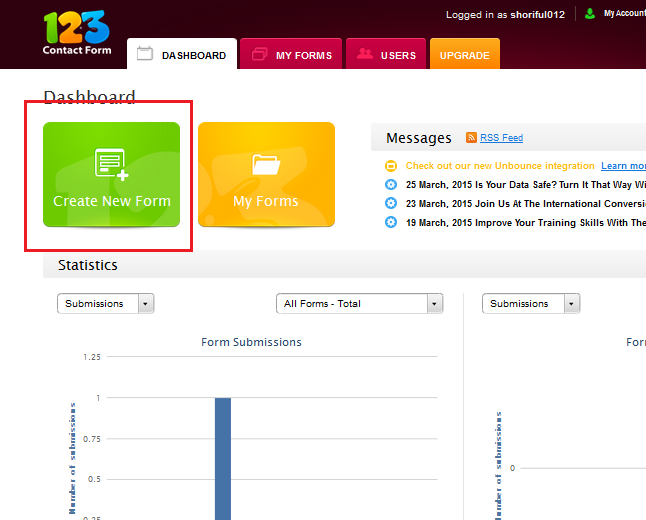
2. After Log in to your account you will get dashboard window. Now click on 'Create New Form" button. 


3. after clicking on Create New Form button you will get on this window form type/category. Now you have to chose right type/category. your form type will be 'Contact & Lead Form" . Click on that type.


4. here write you form name and click on OK, write form name is 'Contact" or as your wish.
 5. after click on ok button you will get full form interface to edit and modify form. here you can to add, delete, copy, modify  new text fields,  see screen short below. on this step you can to add text fields only.


6.  1. here when you click on any fields you will see the more option. 2. on this option you can to modify field type, label, label style, label visibility, field size, field validation, required option, form instruction. 3. see right site + X and array symbol. + symbol for copy field, X symbol for delete field, and array symbol to modify field size width  4. Before Continue preview your form clicking here 'Preview' button. see screen shot below.


7. after that click on Continue button right-up corner. and don't change anything on this page just click on save and continue button again.


8. on this page don't change nothing. but if you understand you can to change as you want. just see left site option there click on Facebook option and click on Finished. and watch the videos on this page to finished form add Facebook page. or click on link  go to 123ContactForm Application for Faceboo
and select a created form and select page and click on add a form button. you have done. for better understanding watch video tutorial here

Friday, March 27, 2015

Tag people or friends in post of business page

Tag peoples or friends in facebook post  of business page : Some people asking on Facebook how to tag friends/peoples in post of page. but could not find and tips about it but i discovered a tips. if any one want o tag friends a page post it's possible. now i will teach you how to do this work. it you don't trust me please show the picture below which one i have done already and taken a screenshot for good understanding. so now follow some step and you can do this.
   
Tag peoples or friends in post of business page

1. Now loin to your Facebook account and chose a page to create a page. don't use facebook as a page you just create a post as a account but you are posting as page. 


2. Facebook make easy manage page now. you can to show your page right site of Facebook page Go to your page. and create a post with photo and descriptions. and publish post. if you want to tag people or friends you must create a post with photo with descriptions. if you done now publish post. 


 Note :You could not tag peoples or friends during creating post or before publishing.

3. In this step you have to edit the post which you have created before sometime. and here you have to tag peoples or friends easy. if you want to edit this post you have to click on time of your post. screenshot below.


4. after clicking on the publishing time of your post this will be open a popup window like below.  1. Now here you have to click on down array and change the comment you are Editing post as a account not as a page. 2. click on "Edit" button, here you can to Edit description, setup caption of your picture. and tag peoples/friends.  


5. After clicking on Edit Button you will see the window like below screenshot. 1. Edit/add description. 2. Add/Tag peoples or friends. write a first later of your friend name friends are automatically will be appear there if your internet speed is good then chose friends to add/tag in post  3. Photo caption. 4. set up previous time/back time. 5. Click on this after finished Editing. 6. Editing As page admin not as a page. 


Note : You must post a photo or video to tag people and you could not tag any fans of your page. you can to tag this post only your friends. if any problem i'm here. For Good Understanding Watch Video Tutorial

Wednesday, March 25, 2015

facebook tips for find friend or others email ID lass then 5 minutes

Facebook tips for find friend or others email ID lass then 5 minutes: maximum people don't share they are email id for safety. but sometime you have to need find friend or others email if you have Facebook business or others issue. i think you already try about it but you are field but don't worry. Now i will teach you how to find Facebook friend or email which hidden from you and public you have follow just some step.    

1. On this way you need have to Facebook account and yahoo email id. yahoo email id is the best for this option. if you don't have those or one please create first. 

2. Now log in to your yahoo email first and  
  1. click on 'Contacts' icon 
  2. click " Actions" for drop down options there 
  3. click "Import" Option. if you don't understand see screenshot below 
Facebook tips for find friend or others email ID lass then 5 minutes

3. Now you will get new page like below there click 'import' which options is for Facebook.


4. Here will be open a popup window in this window have to log in your Facebook account if you are not loged in already. screenshot below

5. after login on this window yahoo automatic import all email id of you friends. if your friend account created with email id. if your friend create Facebook account with mobile number you never get this number or email id.


I think you have done everything as well. after finish this work you will get all email id of you Facebook friend.

Note: If you want to get others people email id you must need to be friend with that people on Facebook.

if you like this tutorial share with your friends and like my Facebook fan page

Friday, March 20, 2015


How to hide the post which is tagged by others or friends. Turn on Tag Review to review tags friends add to your content before they appear on Facebook. When someone who you're not friends with adds a tag to one of your posts you'll always be asked to review it. now i will teach you How to hide the post which is taged by others or friends. just follow some step below.

At first Login your facebook account and

1. Click in the upper-right corner of any page on Facebook and select Settings

Click on the settings now for like below screen


2. Now click on the option "Timeline and Tagging" after that click on "Edit" Button of "How can I manage tags people add and tagging suggestions?" for screen blow.


3. Now you have to choose "Enable" Option to active this feature. I think you  have done all settings easy.

If you Enable this feature you have to check "Activity Log" Option there you have to Allow  tagged post by others or friends which you want to allowed your timeline

How to turn off  Facebook notification sound

How to turn off  Facebook notification sound : Facebook notification is like facebook friends activities about your Facebook account. when you active you Facebook account you will listen sound if anyone do the comment, like on you post you will get a notification and sound. If you want you can to turn off this notification sound easy. now i will show you how to turn off this notification sound. just follow the step below.


To turn off notification sounds, go to your notifications settings and uncheck the box next to Play a sound when each new notification is received:

   1. Click in the upper-right corner of any page on Facebook and select Settings
   2. Click Notifications in the left column
   3. Find the How you get notifications section
   4. Click View next to On Facebook
   5.Uncheck the box next to Play a sound when each new notification is received
   6. Click Save Changes

if you don't understand please follow the screenshot below


 login your Facebook account first.

1. Click in the upper-right corner of any page on Facebook and select Settings


Click on "Settings"

2. Click Notifications in the left column


3. Find the How you get notifications section and 4. Click View next to On Facebook


5. Uncheck the box next to Play a sound when each new notification is received    6. Click Save Changes


This setting only applies to notification sounds when you're using Facebook on your computer and doesn't affect notification sounds on your phone or tablet. like my fb fan page to get update tips here.

Friday, February 20, 2015

(Facebook tips ) Continue reading or See more link on facbook post

(Facebook tips ) Continue reading or See more link on facbook post. today i want to write about facebook marketing tips, to get more like or response of your facebook business or product page. some time need some tips to get more like. so there have more way how to insert a hyperlink in post of your facebok page 
now follow some step. it's working 100% .

Step. 1 . At first you need to collect you facebook page id, don't worry i will teach you where you will get facebook page id . click here and submit your facebook page link after that you will get your facebook page id. see below picture.


 Step 2. After click on "Lookup numeric ID" you will redirect on id page now copy this id. At this time use this code "  @[PAGE ID:0] " to make post.  and this code " @@[0:[PAGE ID:1:Continue_Reading]] " Now replace this txt "PAGE ID" with your page id.


If you don't understand i will teach you clearly. now open a txt editor like "NOTEPAD" and create a post like this picture below.

(Facebook tips ) Continue reading or See more link on facbook post

Step 3. Copy all txt from notepad and  Now go to your facebook page to make post. follow this url "m.facebook.com/pagename.  if you are from desktop. don't now use http://www. just replace with m.
and past all txt which you already copy from notepad. at last click on "Post" button of facebook page to published post. you have done now see your post from desktop or mobile. see my created post screenshot blow .

(Facebook tips ) Continue reading or See more link on facbook post

If you are unable to create Continue reading link in  post comment below or contact with me on facebook

Popular Posts

Find Us on Facbook

Popular Posts